Showing posts with label OS70FS. Show all posts

Wednesday, 6 May 2015

OS70FS - A Saga

I bought this engine off eBay on a fixed price auction. The engine was described as in good condition and on receipt it certainly appeared to be the case. Compression was good, the engine was very clean with minimal staining on the exhaust. A minor clean up and added a little oil to the crankcase and positive feedback was left


The engine was destined for the Great Plains Groovy which I had recently acquired from a club member. The specification for the engine stated use either a 12x8 or 13x7  prop so one of each (APC) was bought and the model tested accordingly.

As you can see from my previous ramblings here, performance was pretty dreadful, there was barely sufficient performance to get the model in the air never mind perform authoritative aerobatics.

An investigation was required.

Tappets

First to check was the tappets. This is very easily done, remove the rocker box cover and using the supplied 0.040mm and 0.10mm  feeler gauges, adjust the tappet so that the larger gauge doesn't fit and the smaller one does. To adjust the tappets, release the locknut using the wrench then adjust the gap using a hex Allen key. Hold the tappet screw while retightening the nut when complete or the gap will close up again. This will give you a gap within the recommended range of 0.040 to 0.10mm. The adjustment must be carried out with the engine cold.  Simply turn the engine over until one of the valves is fully depressed, then check the other - which will be fully closed. When done turn the engine over again until the second valve is depressed then repeat the process for the remaining valve.

The tappets were actually set to 0.040 INCHES, approximately 25 times too big!. These were readjusted and I was convinced that this would have resolved the problem. The fatal flight at NPOD Skelbrooke was the result - the model was still seriously underpowered.

The engine was removed from the model and placed on a test bench and run up. On the 12x8 prop, it was turning over with a peak of about 9000 rpm. This is about 3000rpm down from what OS considers to be typical for this engine/prop combination and explains why power was lacking. It didn't explain what was wrong with the engine though.

In the meantime, I fitted an SC61 to the Groovy which transformed the model, it was now behaving as it should with a sparkling performance on a 11x7 Graupner propeller.

Back to the OS70, It was decided to perform a full strip down and check the valve timing.

Valve Timing

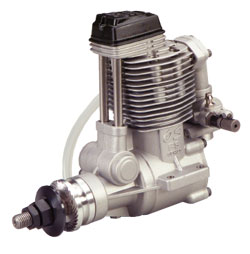
The camshaft sits in that little cylindrical housing in front of the cylinder. This is helically gear driven by a matching gear machined in the crankshaft. Two small cam followers push against the pushrod that are enclosed within the two shiny tubes and these rods operate the valves via the rocker box in the cylinder head.

It is clearly important that the valves open and close at the correct time otherwise the engine cannot run optimally. Timing is quite easy to check. Remove the back plate and glow plug, turn the engine to top dead centre - conrod at the top,


 remove the camshaft cover (2 screws)


and look for a timing mark on the camshaft. This is a little dot stamped adjacent to a gear tooth. If the mark is not visible, rotate the engine crankshaft one full revolution - the camshaft is geared and will only turn half a revolution. If the timing is correct, then a line that is subtended from the push rod tubes, through the centre of the camshaft should align with the dot,  i.e. the dot should be just past bottom towards the front of the engine.

Mine didn't! The photo below with the little dotted red arrow (click on the photo to enlarge), is one tooth out.


To change this, simply remove the rocker box cover (again), remove the rockers (2 screws), This takes the pressure off the pushrods. Turn the engine upside down (the pushrods will fall out!) so the cam followers fall away from the camshaft and then carefully unwind (its on a helical gear train) the camshaft, twist it (in my case one tooth anti clockwise) then slide it back in again and carefully reassemble. Recheck the tappets again before the rocker box cover goes back on again.

The next bench run showed 11500 rpm on a 13x7 prop - much more healthy.

In the meantime, the SC61 had seized (another story), so this engine was placed back into the Groovy and test flown. As you can imagine, the model performed perfectly with ample power for decent vertical manoeuvres.

Thursday, 19 March 2015

World Models Groovy

I have recently acquired (second hand) a World Models Groovy 50. This is a first for me on two counts:

1. I am flying someone else's model
2. Its an ARTF
3. Its a (fairly) modern aerobat

(OK - 3 counts)

It looks a bit like this:

A pretty looking aeroplane and like most new models I thought that it would be the making of my aerobatic career.

It needed a bit of tidying up. The original undercarriage legs had been replaced with an alloy alternative - and the spats had punctured the lower wing sheeting when the original undercarriage had collapsed (along with the lower fuselage - the joy of landing on a grass strip). The previous owner had also kindly bolted the new U/C assembly on  using M5 Nylon bolts - to save the fuselage in the event of another disaster.

I also acquired a S/H OS70FS for this from eBay at a very reasonable price, so all assembled and with new digital aileron servos - off for a maiden flight.

I had already taken the wise precaution of setting 2 stage rates on Aileron and Elevator.

The first flight almost ended in disaster - there was far too much aileron throw and insufficient expo. A quick flick to very low rates and I had a manageable model which I carefully flew for a few minutes - it was clear there was still far too much aileron travel.

A quick landing and readjust the rates and expo and I was away again. The engine was a bit disappointing, not pulling anywhere near as hard as I expected but at this time I was more concerned with the model handling.

After a few basic manoeuvres, I brought it in for a landing and although quite gentle, the soft ground was too much for the undercarriage and the Nylon bolts sheared - I now have 2 spat shaped holes in the lower wing. <sigh>

Back in the workshop, the wing was repaired again, the loose trim was reapplied and an attempt was made to reduce aileron throw.

Now - why cant servo manufacturers make a low travel servo - something like +/- 30 degrees instead of the usual +/- 75 degrees or so? The torque arm was placed on the innermost servo arm hole and two new extended horns added to replace the marginally shorter horns on the ailerons.


Take 2 on the flying field.  This was an evening flight - just before dusk. The model is behaving better but roll rate is still far too high but now more manageable. The first flight almost ended with a pancake as the engine cut on a 3 turn spin. I just managed to recover it and get in a very fast downwind landing. The next hour was trying to work out what had gone wrong as the engine would start but not pick up, so exhaust off, cowl off and I discovered the throttle linkage arm had come loose on the carb - my fault, I should have checked it.

A quick second flight - but now starting to get a bit concerned about lack of power.

Take 3 on the flying field - the day following 16 hours of heavy rain and the strip was sodden again. My problem now was getting the model in the air - it was flat calm. Just visualise a 40mph taxi run and you will get the idea.

Eventually got it away and now really trying to sort out the trim, the model appears to be crabbing in flight and definitely leaning left on an upline. Spent 10 minutes rolling, looping eights etc and just building up confidence in the model. A very nice approach - although rather fast - saw the undercarriage disappear and associated holes in the wings reappear as the Nylon bolts sheared again. A quick repair with tape for 3 further flights and I was left with a list of things to do.

1. Reduce aileron travel even more. I know that I can use rates, but I really prefer to be able to use full travel - if for no other reason to protest the feedback pot in the servos.
2. Add a bit of right thrust
3. Add some expo on rudder, its far too sensitive around the mid position
4. Reduce the height of the tailwheel - get the nose pointing upwards a bit more
5. Service the motor
6. Bolt the undercarriage on using Steel bolts!

To reduce the aileron travel, I drilled another hole nearer the servo output spindle - only about 3mm further in but that is the nearest to the output shaft that  I can get. If it's still not enough then I will need to put even bigger aileron horns on.

The side thrust was achieved with a shim of 1/32 ply just inside the left engine (radial) mount bolts.
When I eventually managed to get the head off the engine -  a bit of a worrying sign as one of the cover bolts hex head was knackered, I found that the tappets had been set using an imperial feeler gauge rather than metric - i.e. 04" rather than .04mm. I was amazed the engine ran - hopefully that should now be sorted ready for the next flight.

We will see.